
Diese Anleitung zeigt, wie Sie die Auto Power On-Funktion im BIOS für X86-Motherboards konfigurieren. Einmal aktiviert, Der Industrie-PC startet automatisch, wenn die Stromversorgung nach einem Stromausfall wiederhergestellt ist. Diese Funktion wird häufig in unbeaufsichtigten Anwendungen verwendet, einschließlich Kioske, Industrielle Steuerterminals und Überwachungsgeräte.
X86-Motherboards:
Nachdem Sie die Tastatur angeschlossen und den Netzschalter gedrückt haben, Drücken Sie weiterhin die Entf-Taste auf der Tastatur, um die BIOS-Schnittstelle aufzurufen. Wählen Sie „Erweitert“., wie im Bild gezeigt.
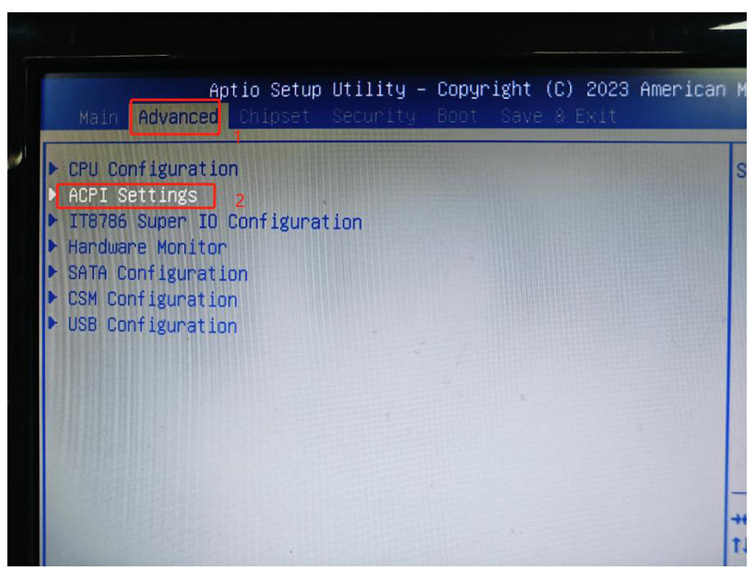
Wählen Sie dann ACPI-Einstellungen
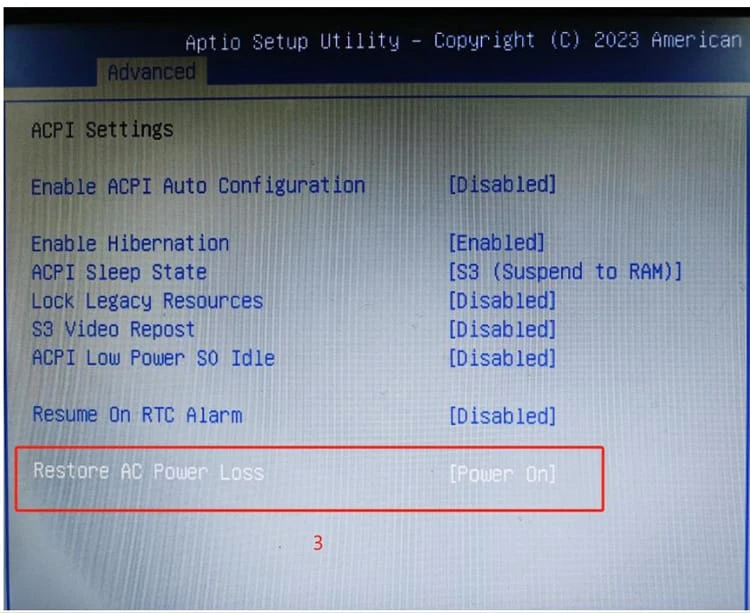
Wählen “Einschalten” unter “AC-Stromausfall wiederherstellen” und drücken Sie die Eingabetaste, wie im Bild gezeigt.
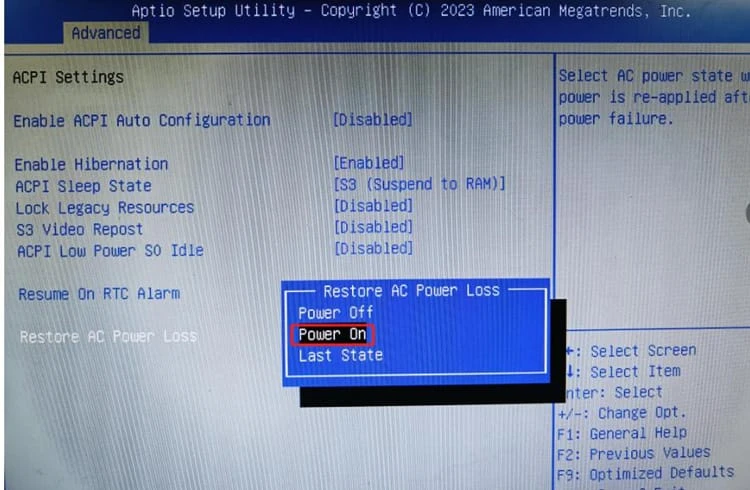
Drücken Sie dann F10, Das Gerät startet automatisch neu und tritt in das System ein. Fahren Sie anschließend das Gerät herunter (klicken “Abschalten” im Startmenü). Nach dem Herunterfahren, Ziehen Sie das 220-V-Netzkabel ab. Die blaue Kontrollleuchte am Netzteil leuchtet weiterhin. Warten Sie, bis die Kontrollleuchte am Netzteil vollständig erlischt (etwa zehn Sekunden) bevor Sie das 220-V-Netzkabel wieder einstecken. An dieser Stelle, Sie werden sehen, wie sich das Gerät automatisch einschaltet.
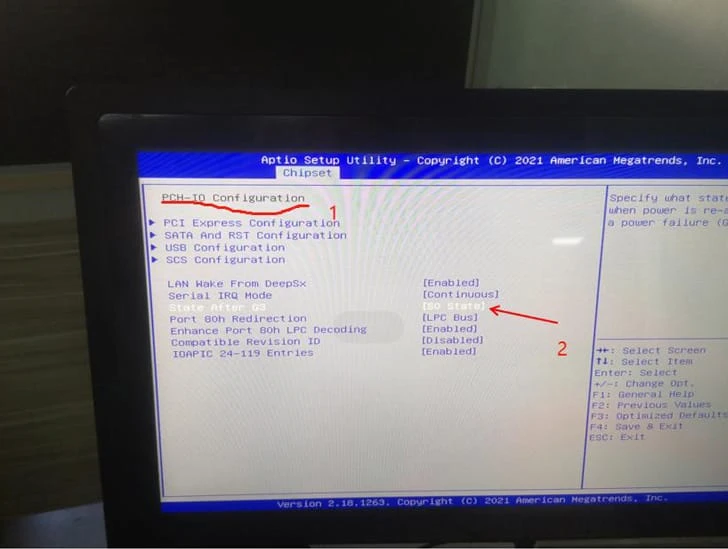
Schließen Sie eine externe Tastatur an und drücken Sie während des Startvorgangs wiederholt die Entf-Taste, um das BIOS aufzurufen. S5 zeigt den automatischen Start beim Einschalten an, und S0 zeigt an, dass es deaktiviert ist. Denken Sie daran, zum Speichern F4 zu drücken. Wenn S5 bereits standardmäßig ausgewählt ist, Schalten Sie es auf S0 um und drücken Sie F4 zum Speichern, wie im Bild gezeigt.
Hinweise zu den Autostart-Einstellungen beim Einschalten:
Nach dem Einrichten des automatischen Starts im BIOS, Fahren Sie das Gerät herunter, nachdem es in das System gelangt ist (durch Klicken “Abschalten” im Startmenü). Nach dem Herunterfahren, Ziehen Sie das 220-V-Netzkabel ab. Die blaue Kontrollleuchte am Netzteil leuchtet weiterhin. Warten Sie, bis die Kontrollleuchte am Netzteil vollständig erlischt (etwa zehn Sekunden) bevor Sie das 220-V-Netzkabel wieder einstecken. An dieser Stelle, Sie sollten sehen, dass sich das Gerät automatisch einschaltet.
Einstellungen für den automatischen Start des CX-Motherboards der 10. Generation beim Einschalten, wie im Bild gezeigt.
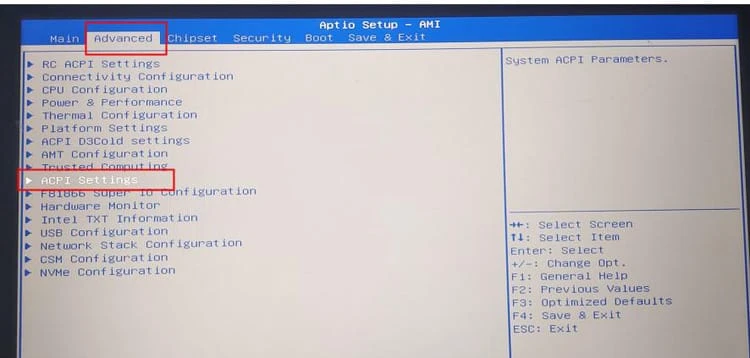
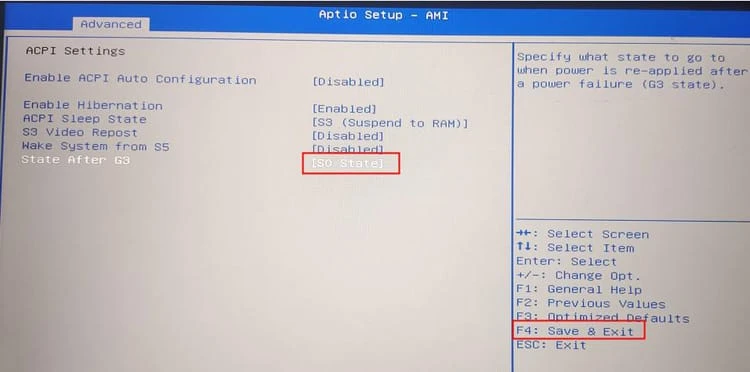
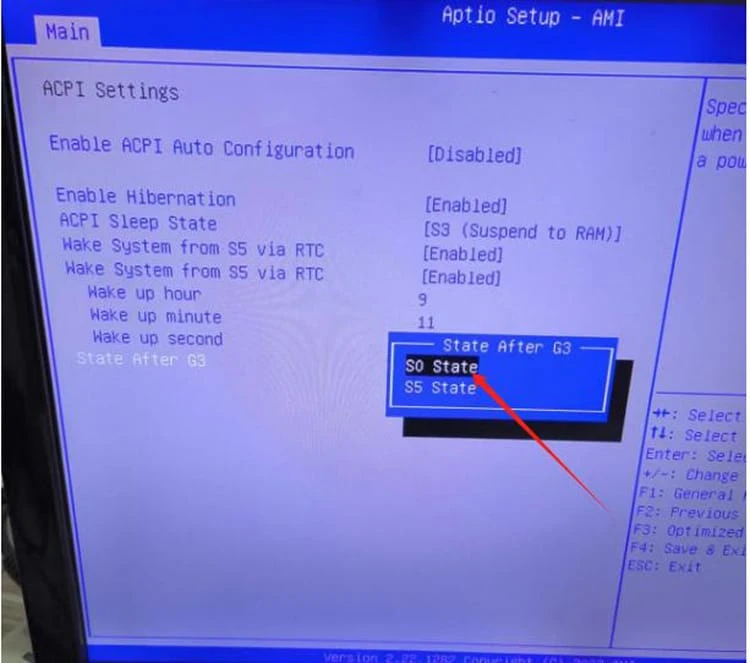
Schließen Sie eine externe Tastatur an, Drücken Sie nach dem Einschalten wiederholt die Entf-Taste, um das BIOS aufzurufen, wählen “S0-Zustand” nach “Zustand nach G3”, Drücken Sie F4 zum Speichern und Beenden, um die Einstellungen abzuschließen.
Nach dem Einrichten des automatischen Starts im BIOS, Fahren Sie das Gerät herunter, nachdem es in das System gelangt ist (durch Klicken “Abschalten” im Startmenü). Nach dem Herunterfahren, Ziehen Sie das 220-V-Netzkabel ab. Die blaue Kontrollleuchte am Netzteil leuchtet weiterhin. Warten Sie, bis die Kontrollleuchte am Netzteil vollständig erlischt (etwa zehn Sekunden) bevor Sie das 220-V-Netzkabel wieder einstecken. An dieser Stelle, Sie sollten sehen, dass sich das Gerät automatisch einschaltet.
Drücken Sie während des Startvorgangs wiederholt die Entf-Taste, um das BIOS aufzurufen. Wie im Bild unten gezeigt, Wählen Sie ACPI-Einstellungen.
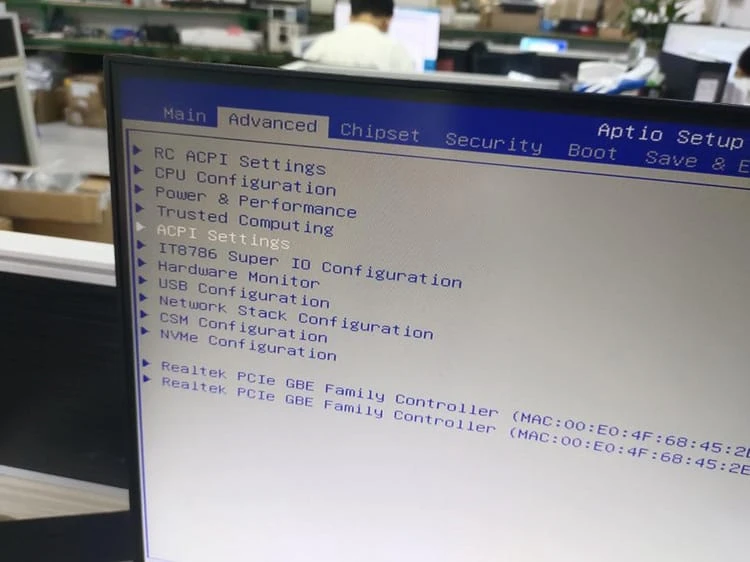
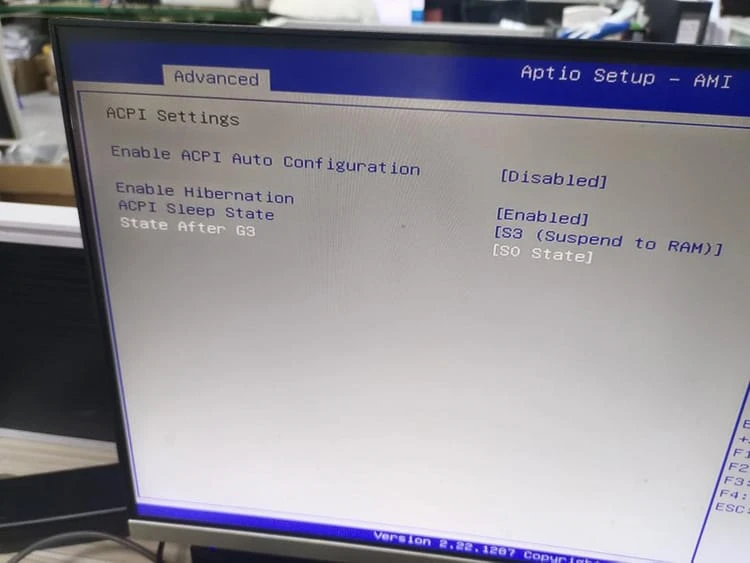
SO zeigt den automatischen Start beim Einschalten an. Nach dem Einstellen, Drücken Sie F4 zum Speichern.
Hinweise zu den Autostart-Einstellungen beim Einschalten:
Nach dem Einrichten des automatischen Starts im BIOS, Fahren Sie das Gerät herunter, nachdem es in das System gelangt ist (durch Klicken “Abschalten” im Startmenü). Nach dem Herunterfahren, Ziehen Sie das 220-V-Netzkabel ab. Die blaue Kontrollleuchte am Netzteil leuchtet weiterhin. Warten Sie, bis die Kontrollleuchte am Netzteil vollständig erlischt (etwa zehn Sekunden) bevor Sie das 220-V-Netzkabel wieder einstecken. An dieser Stelle, Sie sollten sehen, dass sich das Gerät automatisch einschaltet.
BIOS-Einstellungen
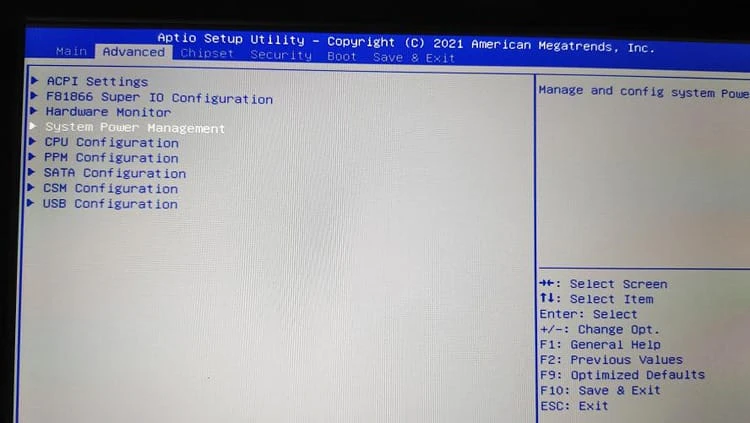
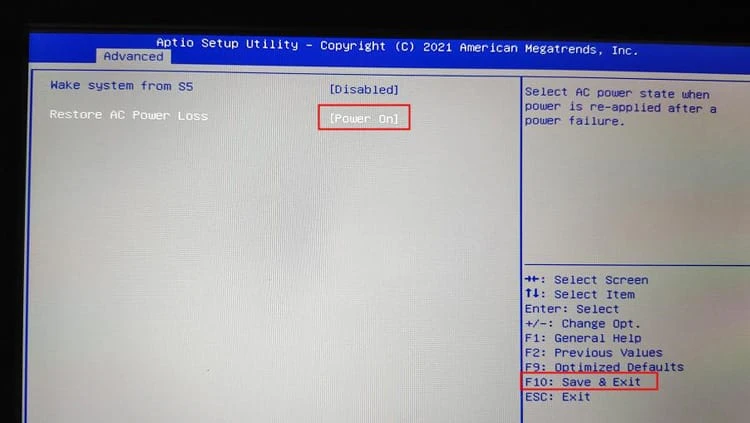
Mit einem CX1900-Motherboard und einer externen Tastatur, Drücken Sie während des Startvorgangs wiederholt die Entf-Taste, um die BIOS-Einstellungen aufzurufen. Verwenden Sie zur Auswahl die linke und rechte Pfeiltaste “Fortschrittlich” -> “Systemenergieverwaltung”, ändern Sie die “Beheben Sie den Verlust der Wechselstromversorgung” Option zu “Einschalten”, und drücken Sie dann F10, um zu speichern und zu beenden.
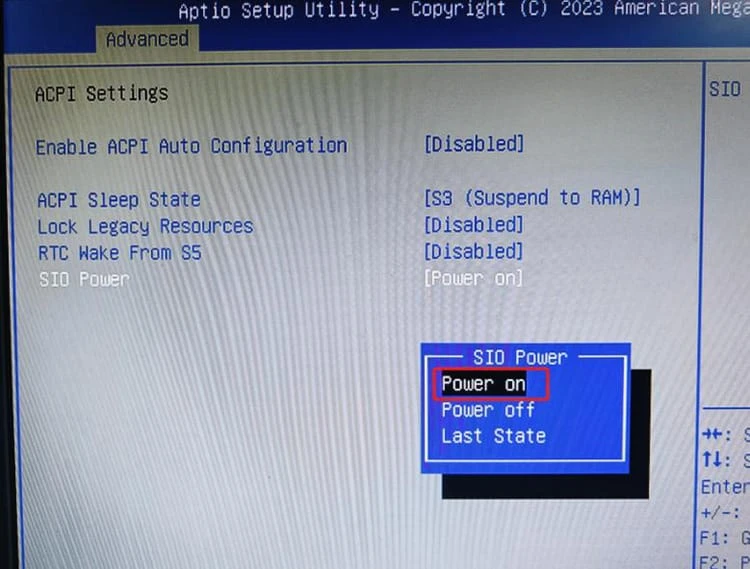
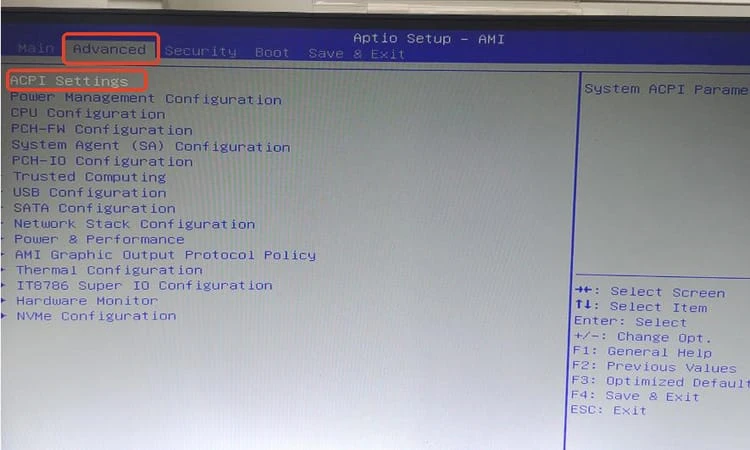
Schließen Sie die Tastatur an den All-in-One-Computer an (Hauptplatine), Drücken Sie den Netzschalter, und drücken Sie dann so lange die Entf-Taste auf der Tastatur, bis Sie die BIOS-Schnittstelle aufrufen. Wählen Sie die aus “Fortschrittlich” Option, und dann auswählen “ACPI-Einstellungen” (wie im Bild unten gezeigt).
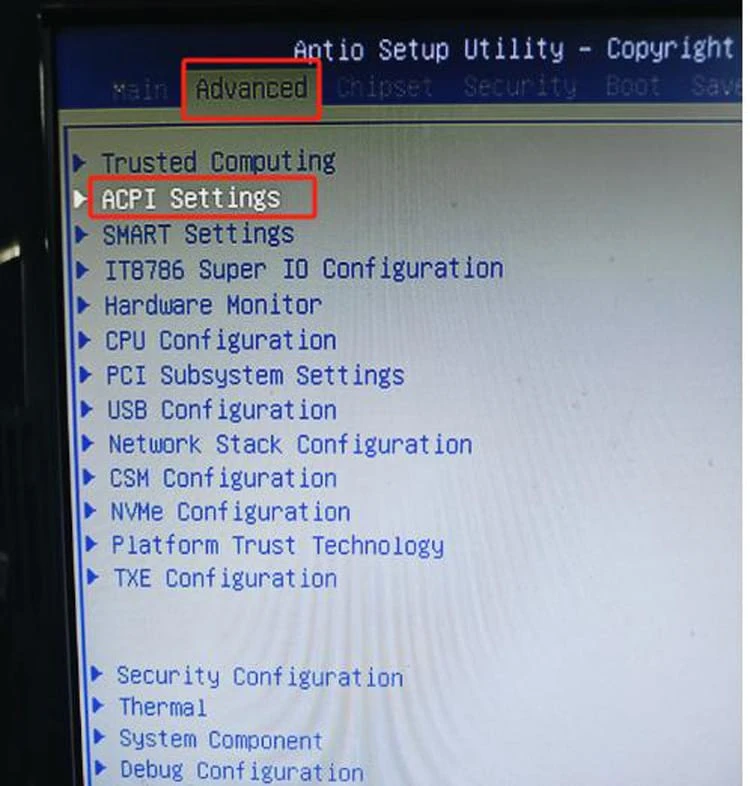
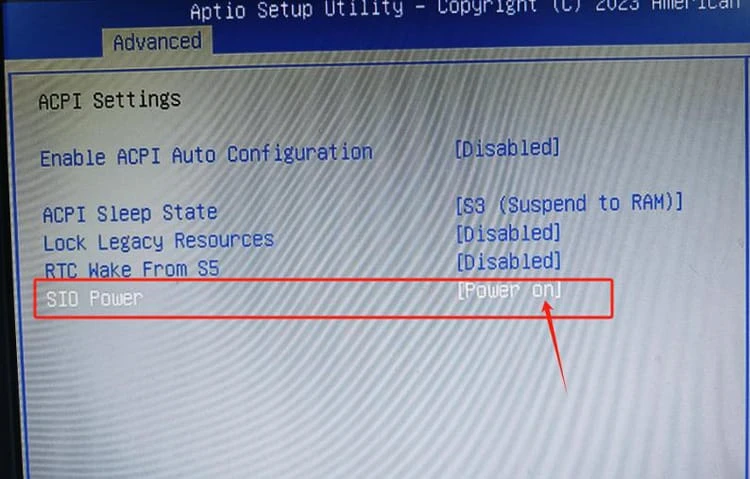
Wählen Sie SIO Power, drücken Sie die Eingabetaste, wählen “Einschalten”, drücken Sie erneut die Eingabetaste, Drücken Sie F4 zum Speichern, und das Gerät wird automatisch neu gestartet.
Hinweise zu den Autostart-Einstellungen beim Einschalten:
Nach dem Einrichten des automatischen Starts im BIOS, Fahren Sie das Gerät herunter, nachdem es in das System gelangt ist (durch Klicken “Abschalten” im Startmenü). Nach dem Herunterfahren, Ziehen Sie das 220-V-Netzkabel ab. Die blaue Kontrollleuchte am Netzteil leuchtet weiterhin. Warten Sie, bis die Kontrollleuchte am Netzteil vollständig erlischt (etwa zehn Sekunden) bevor Sie das 220-V-Netzkabel wieder einstecken. An dieser Stelle, Sie sollten sehen, dass sich das Gerät automatisch einschaltet.
Nachdem Sie die Tastatur an das Gerät angeschlossen haben, Drücken Sie den Netzschalter, Halten Sie dann die Entf-Taste auf der Tastatur gedrückt, um das BIOS aufzurufen. Wählen “fortschrittlich”, dann auswählen “ACPI-Einstellungen” und drücken Sie die Eingabetaste.
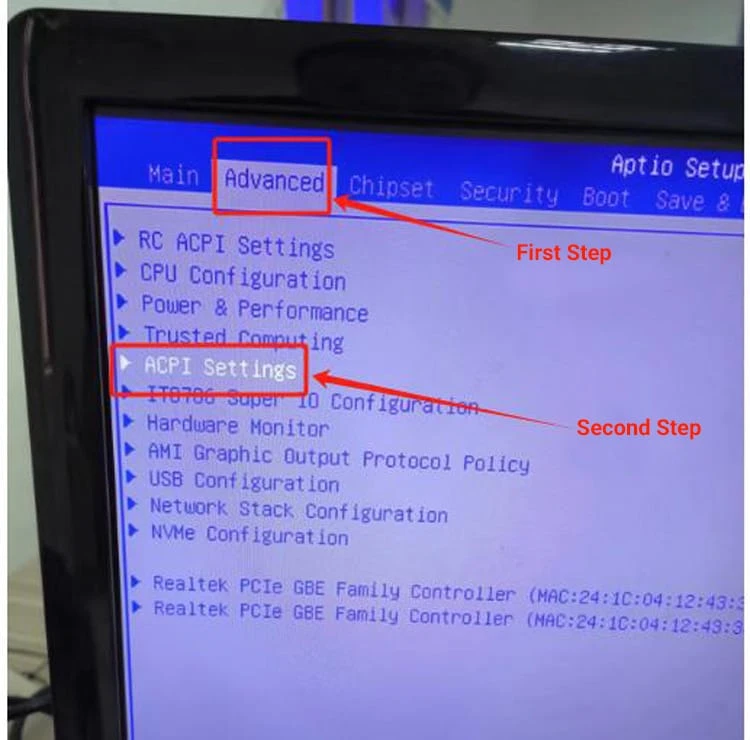
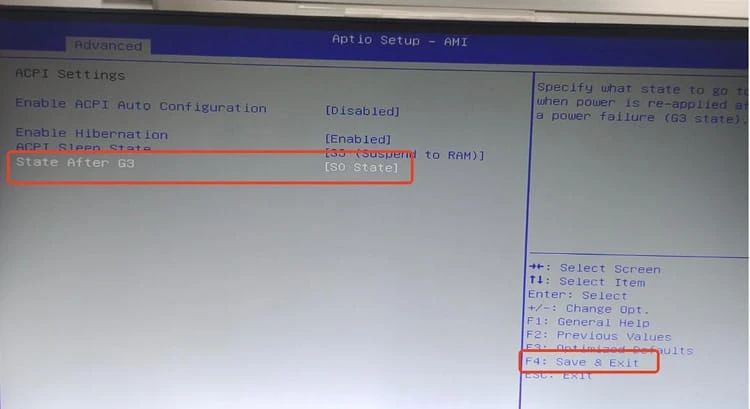
Wählen “Zustand nach G3” und drücken Sie die Eingabetaste.
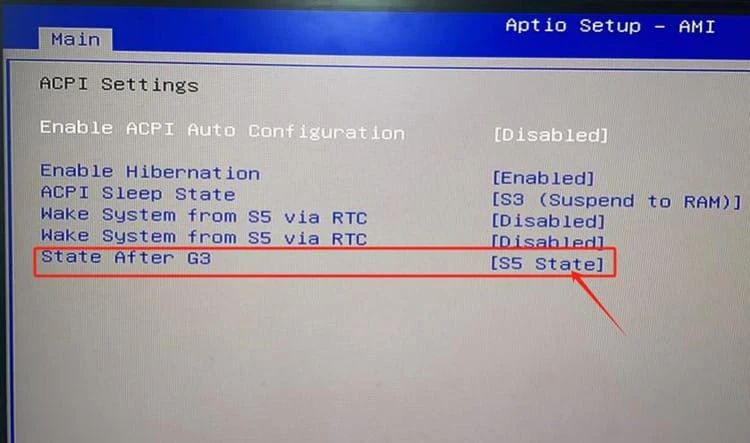
Wählen “S0-Status”, drücken Sie die Eingabetaste, und dann drücken “F4” zu retten.
Hinweise zu den Autostart-Einstellungen beim Einschalten:
Nach dem Einrichten des automatischen Starts im BIOS, Fahren Sie das Gerät herunter, nachdem es in das System gelangt ist (durch Klicken “Abschalten” im Startmenü). Nach dem Herunterfahren, Ziehen Sie das 220-V-Netzkabel ab. Die blaue Kontrollleuchte am Netzteil leuchtet weiterhin. Warten Sie, bis die Kontrollleuchte am Netzteil vollständig erlischt (etwa zehn Sekunden) bevor Sie das 220-V-Netzkabel wieder einstecken. An dieser Stelle, Sie sollten sehen, dass sich das Gerät automatisch einschaltet.
Zum Anschluss einer externen Tastatur, Drücken Sie während des Startvorgangs wiederholt die Entf-Taste, um das BIOS aufzurufen. Befolgen Sie die Schritte im Bild unten, um die Einstellungen auszuwählen. Nach Abschluss der Einstellungen, Drücken Sie F4 auf der Tastatur, dann Enter, dann JA, und drücken Sie erneut die Eingabetaste.
Hinweise zu den Autostart-Einstellungen beim Einschalten:
Nach dem Einrichten des automatischen Starts im BIOS, Fahren Sie das Gerät herunter, nachdem es in das System gelangt ist (durch Klicken “Abschalten” im Startmenü). Nach dem Herunterfahren, Ziehen Sie das 220-V-Netzkabel ab. Die blaue Kontrollleuchte am Netzteil leuchtet weiterhin. Warten Sie, bis die Kontrollleuchte am Netzteil vollständig erlischt (etwa zehn Sekunden) bevor Sie das 220-V-Netzkabel wieder einstecken. An dieser Stelle, Sie sollten sehen, dass sich das Gerät automatisch einschaltet.
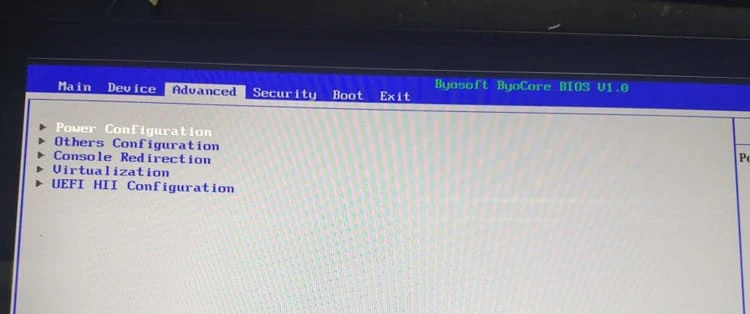
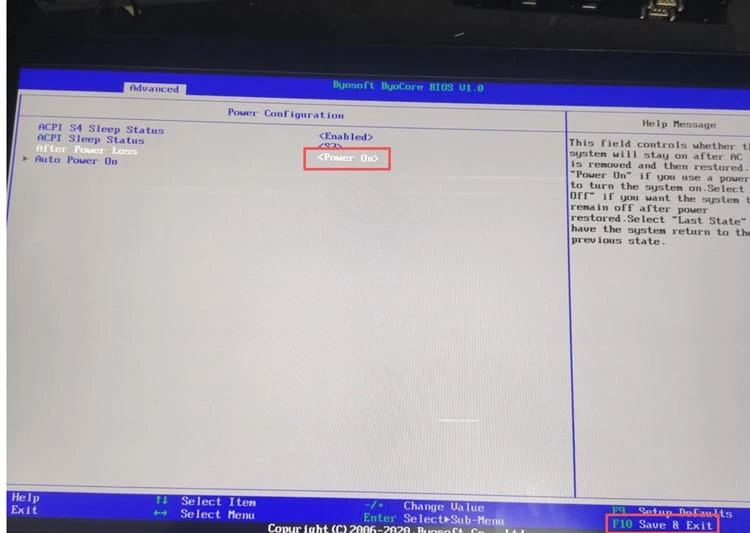
Zum Anschluss einer externen Tastatur, Drücken Sie während des Startvorgangs wiederholt F12, um das BIOS aufzurufen. Wählen Sie die aus “Nach Stromausfall” Option unten “Fortschrittlich,” ändern Sie es in “Einschalten,” und drücken Sie dann F10, um zu speichern und zu beenden, wie im Bild unten gezeigt.
Hinweise zu den Autostart-Einstellungen beim Einschalten:
Nach dem Einrichten des automatischen Starts im BIOS, Fahren Sie das Gerät herunter, nachdem es in das System gelangt ist (durch Klicken “Abschalten” im Startmenü). Nach dem Herunterfahren, Ziehen Sie das 220-V-Netzkabel ab. Die blaue Kontrollleuchte am Netzteil leuchtet weiterhin. Warten Sie, bis die Kontrollleuchte am Netzteil vollständig erlischt (etwa zehn Sekunden) bevor Sie das 220-V-Netzkabel wieder einstecken. An dieser Stelle, Sie sollten sehen, dass sich das Gerät automatisch einschaltet.