
Esta guía muestra cómo configurar la función de encendido automático en el BIOS para placas base X86.. Una vez habilitado, La PC industrial se iniciará automáticamente cuando se restablezca la energía después de un corte de energía.. Esta característica se usa ampliamente en aplicaciones desatendidas., incluyendo quioscos, terminales de control industrial y equipos de monitoreo.
Placas base X86:
After plugging in the keyboard and pressing the power button, keep pressing the delete key on the keyboard to enter the BIOS interface. Select Advanced, as shown in the picture.
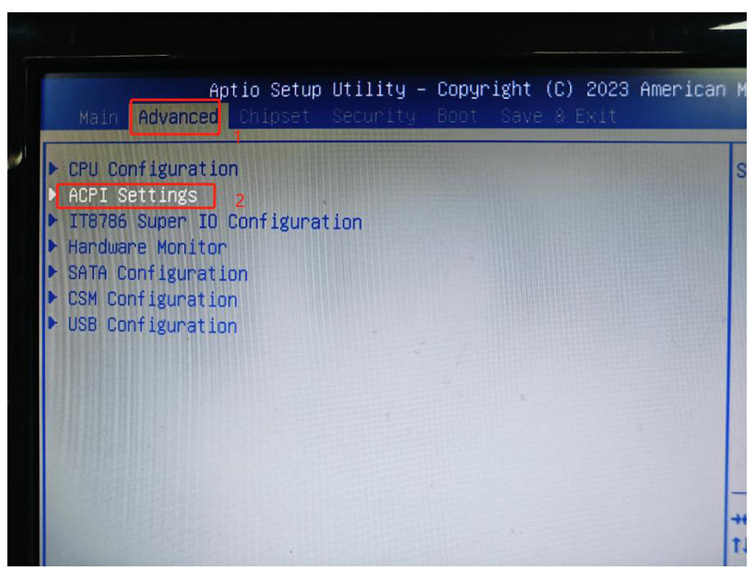
Then select ACPI Settings
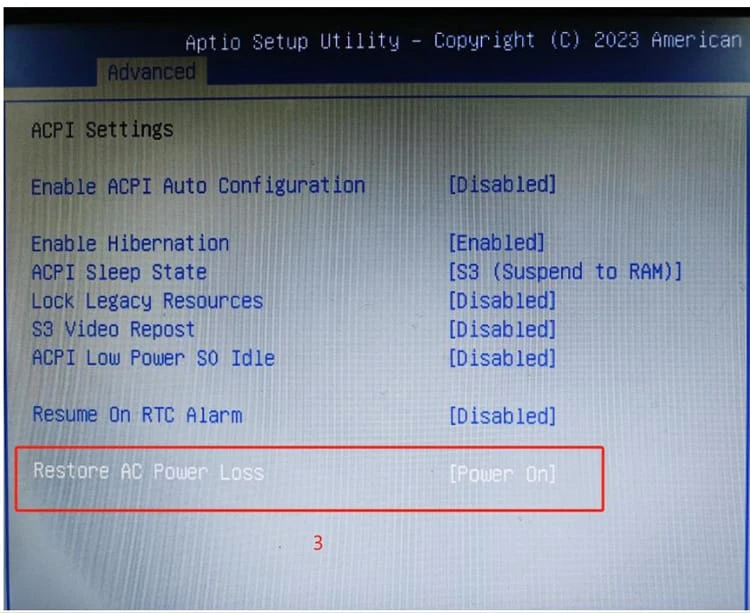
Select “Encendido” under “Restore AC power Loss” and press Enter, as shown in the image.
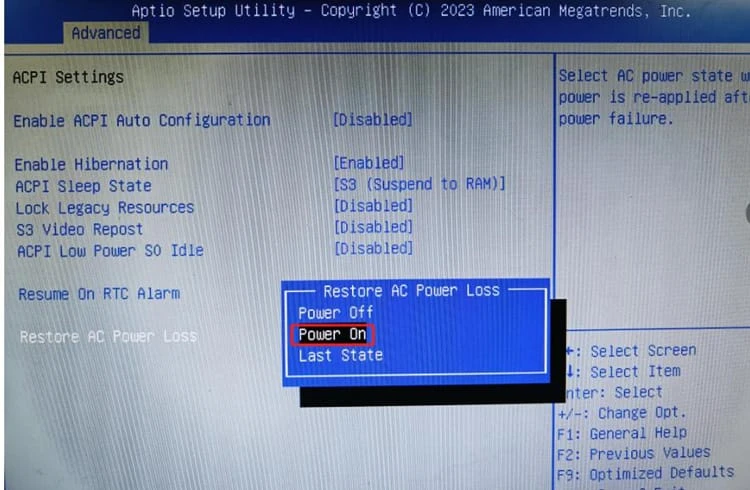
Then press F10, the device will restart automatically and enter the system. Then shut down the device (click “Shut down” in the Start menu). After shutting down, unplug the 220V power cord. The blue indicator light on the power adapter will still be on. Wait until the indicator light on the power adapter goes out completely (about ten seconds) before plugging the 220V power cord back in. At this point, you will see the device turn on automatically.
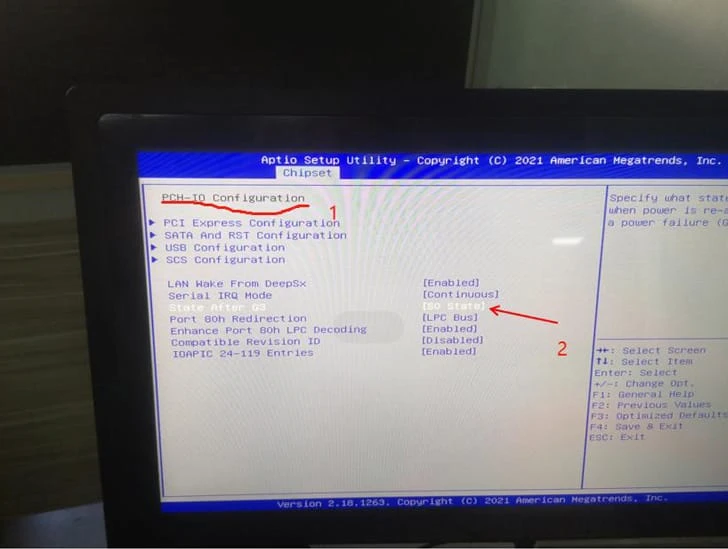
Connect an external keyboard and repeatedly press the Delete key during startup to enter the BIOS. S5 indicates automatic startup upon power-on, and S0 indicates it’s disabled. Remember to press F4 to save. If S5 is already selected by default, switch it to S0 and press F4 to save, as shown in the image.
Notes on power-on auto-start settings:
After setting up automatic startup in the BIOS, shut down the device after it enters the system (by clicking “Shut Down” at the Start menu). After shutting down, unplug the 220V power cord. The blue indicator light on the power adapter will still be on. Wait until the indicator light on the power adapter goes out completely (about ten seconds) before plugging the 220V power cord back in. At this point, you should see the device automatically power on.
CX 10th generation motherboard power-on auto-start settings, as shown in the picture.
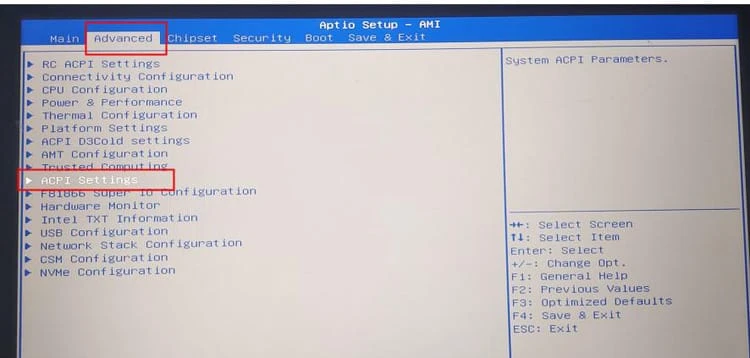
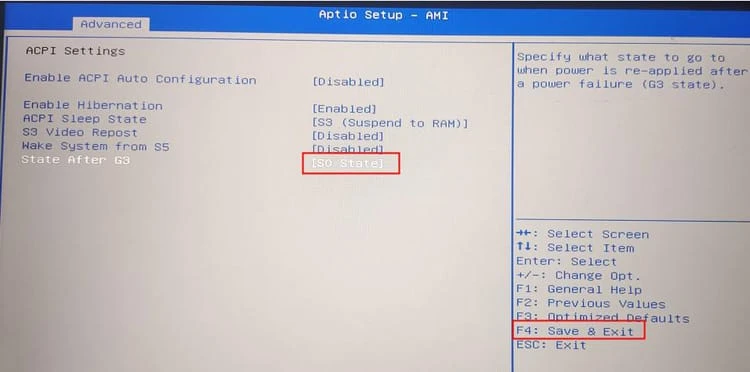
Connect an external keyboard, press the Delete key repeatedly after powering on to enter the BIOS, seleccionar “S0 state” after “state After G3”, press F4 to save and exit to complete the settings.
After setting up automatic startup in the BIOS, shut down the device after it enters the system (by clicking “Shut Down” at the Start menu). After shutting down, unplug the 220V power cord. The blue indicator light on the power adapter will still be on. Wait until the indicator light on the power adapter goes out completely (about ten seconds) before plugging the 220V power cord back in. At this point, you should see the device automatically power on.
Press the Delete key repeatedly during startup to enter the BIOS. As shown in the image below, select ACPI Settings.
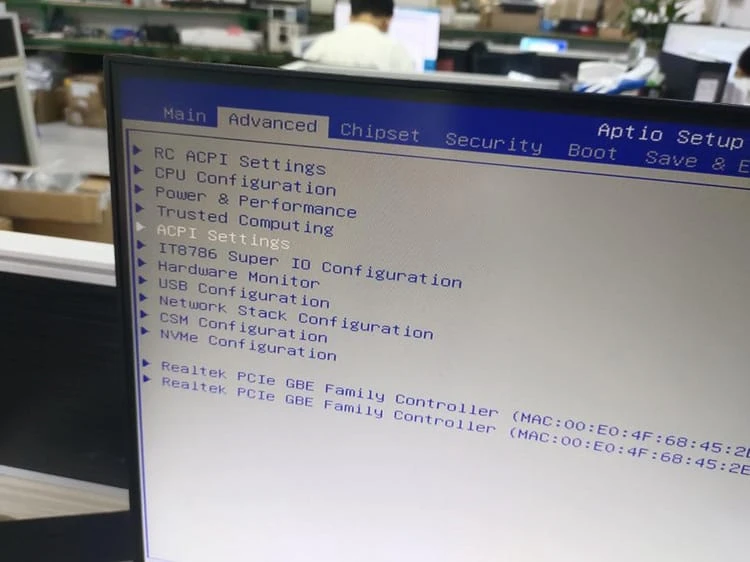
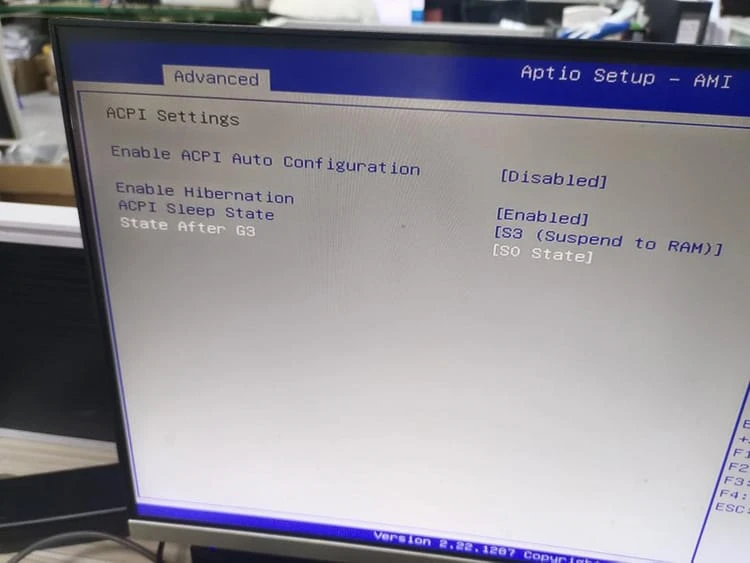
SO indicates automatic startup upon power-on. After setting, press F4 to save.
Notes on power-on auto-start settings:
After setting up automatic startup in the BIOS, shut down the device after it enters the system (by clicking “Shut Down” at the Start menu). After shutting down, unplug the 220V power cord. The blue indicator light on the power adapter will still be on. Wait until the indicator light on the power adapter goes out completely (about ten seconds) before plugging the 220V power cord back in. At this point, you should see the device automatically power on.
Configuración del BIOS
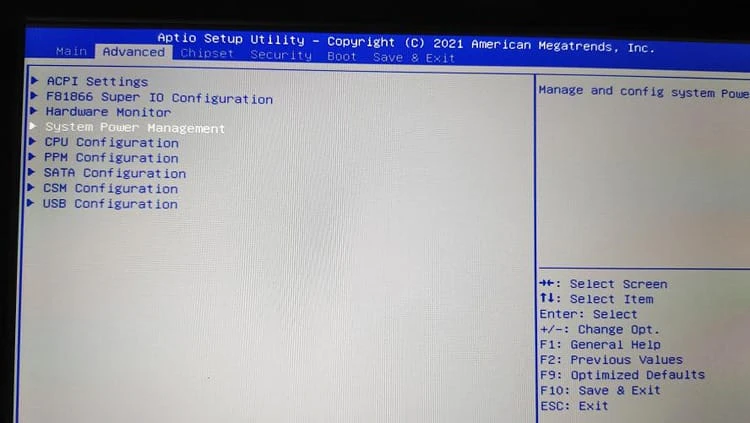
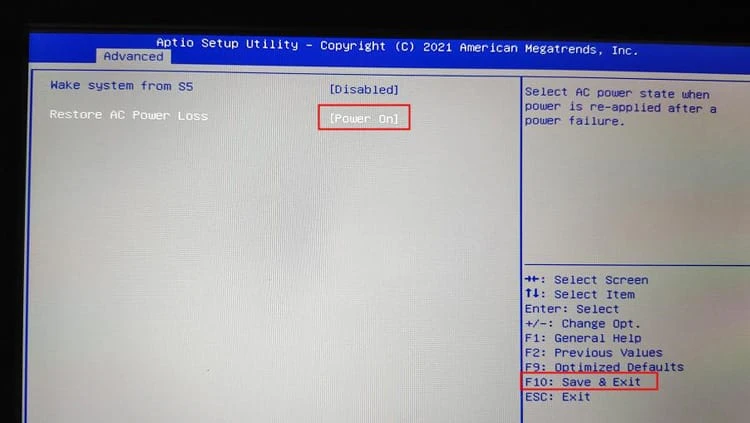
With a CX1900 motherboard and an external keyboard, repeatedly press the Delete key during startup to enter the BIOS settings. Use the left and right arrow keys to select “Avanzado” -> “System Power Management”, change the “Restore AC Power Loss” option to “Encendido”, and then press F10 to save and exit.
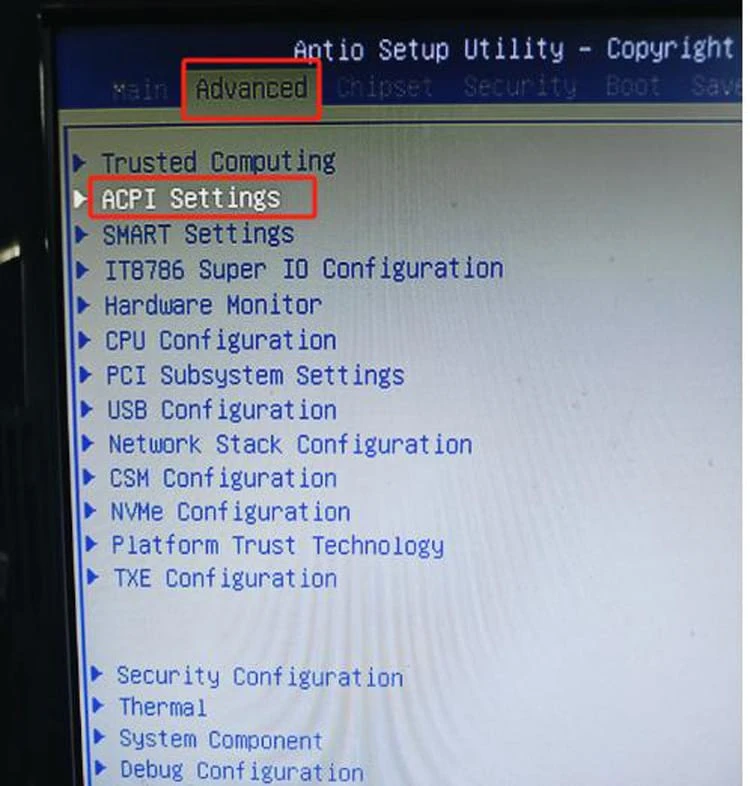
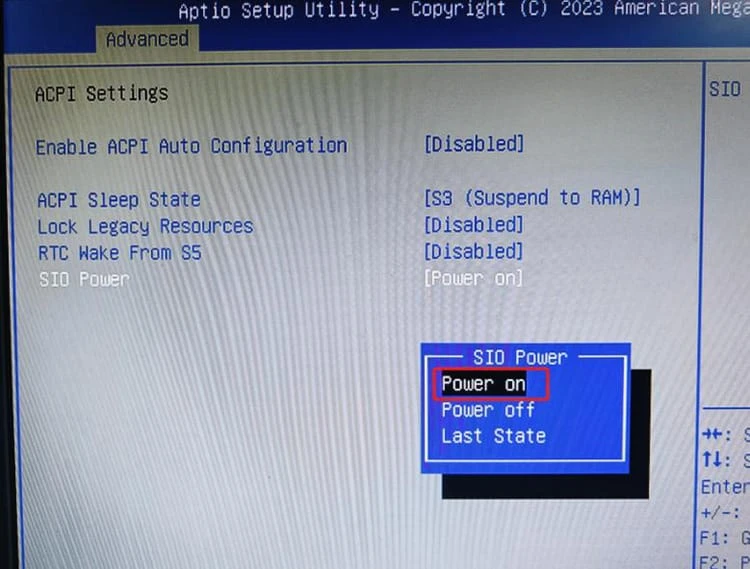
Connect the keyboard to the all-in-one computer (motherboard), press the power button, and then keep pressing the delete key on the keyboard until you enter the BIOS interface. Select the “Avanzado” opción, and then select “ACPI Settings” (as shown in the picture below).
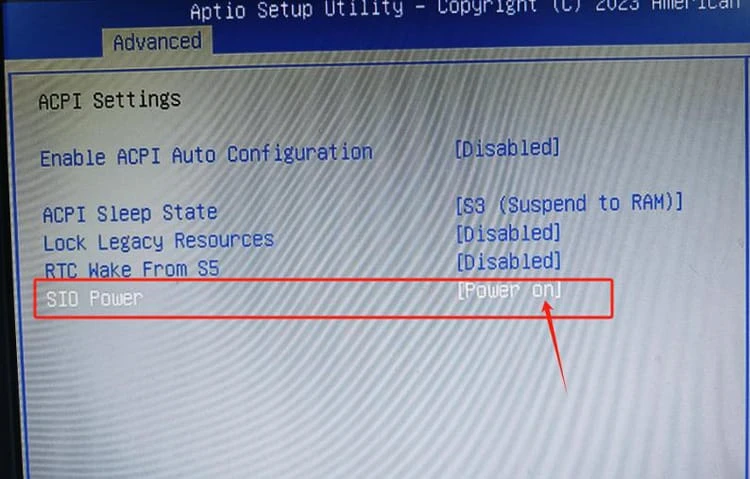
Select SIO Power, press Enter, seleccionar “Encendido”, press Enter again, press F4 to save, and the device will automatically restart.
Notes on power-on auto-start settings:
After setting up automatic startup in the BIOS, shut down the device after it enters the system (by clicking “Shut Down” at the Start menu). After shutting down, unplug the 220V power cord. The blue indicator light on the power adapter will still be on. Wait until the indicator light on the power adapter goes out completely (about ten seconds) before plugging the 220V power cord back in. At this point, you should see the device automatically power on.
After plugging the keyboard into the device, press the power button, then press and hold the Delete key on the keyboard to enter the BIOS. Select “advanced”, then select “ACPI Settings” and press Enter.
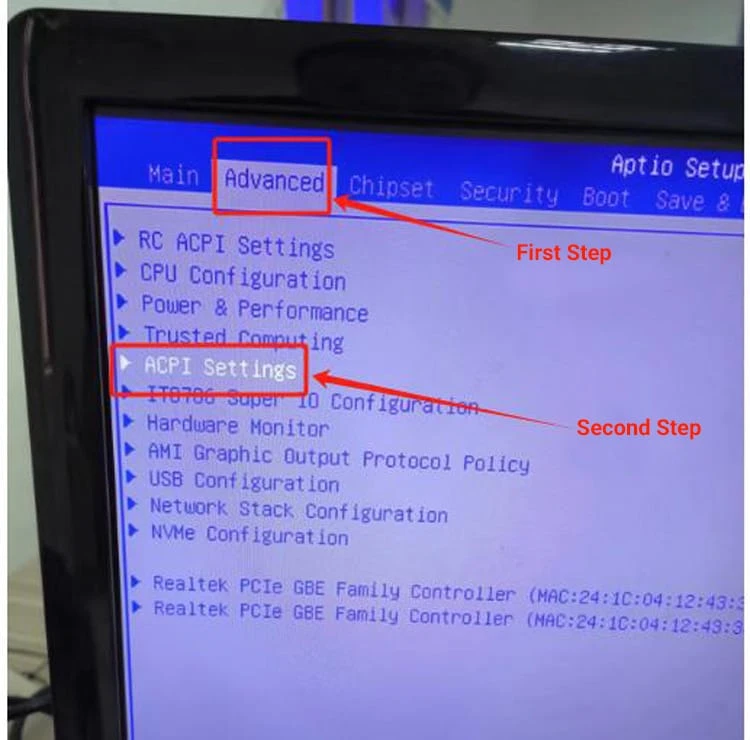
Select “State After G3” and press Enter.
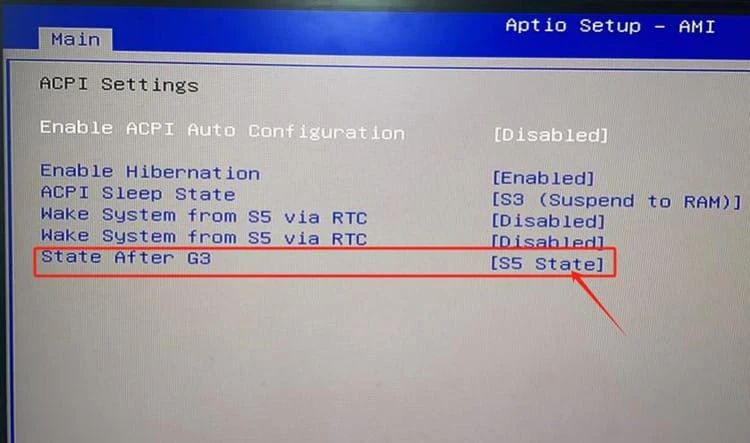
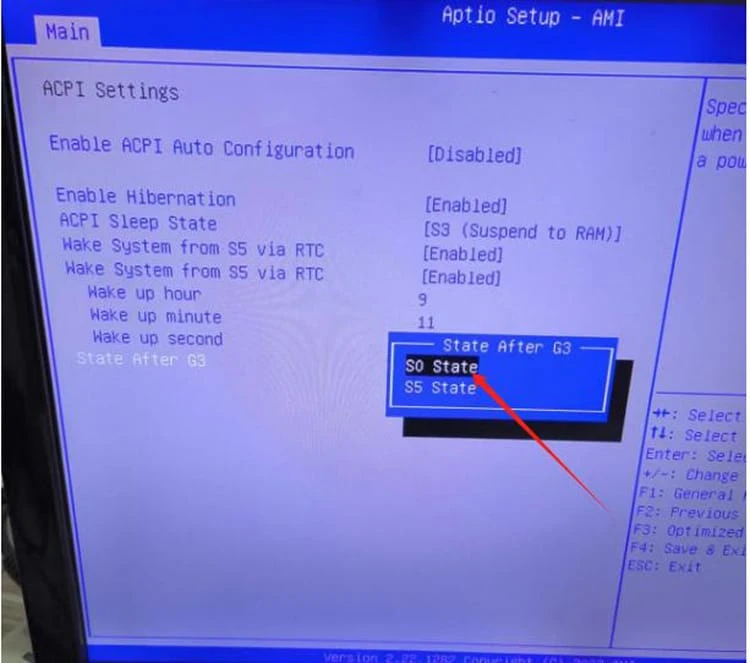
Select “S0 State”, press Enter, and then press “F4” to save.
Notes on power-on auto-start settings:
After setting up automatic startup in the BIOS, shut down the device after it enters the system (by clicking “Shut Down” at the Start menu). After shutting down, unplug the 220V power cord. The blue indicator light on the power adapter will still be on. Wait until the indicator light on the power adapter goes out completely (about ten seconds) before plugging the 220V power cord back in. At this point, you should see the device automatically power on.
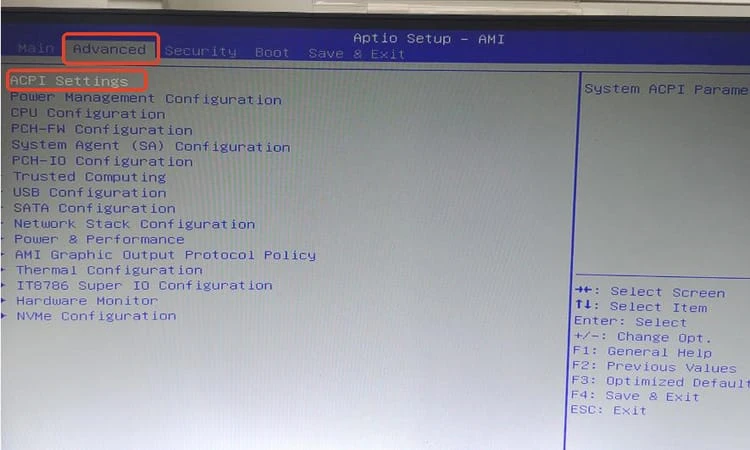
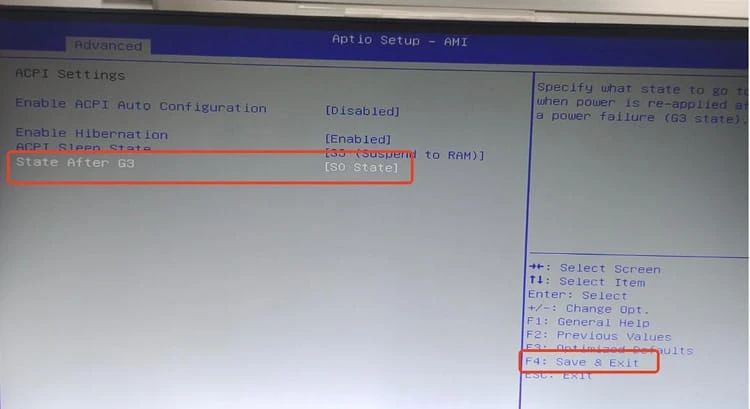
To connect an external keyboard, repeatedly press the delete key during startup to enter the BIOS. Follow the steps in the image below to select the settings. After completing the settings, press F4 on the keyboard, then Enter, then YES, and press Enter again.
Notes on power-on auto-start settings:
After setting up automatic startup in the BIOS, shut down the device after it enters the system (by clicking “Shut Down” at the Start menu). After shutting down, unplug the 220V power cord. The blue indicator light on the power adapter will still be on. Wait until the indicator light on the power adapter goes out completely (about ten seconds) before plugging the 220V power cord back in. At this point, you should see the device automatically power on.
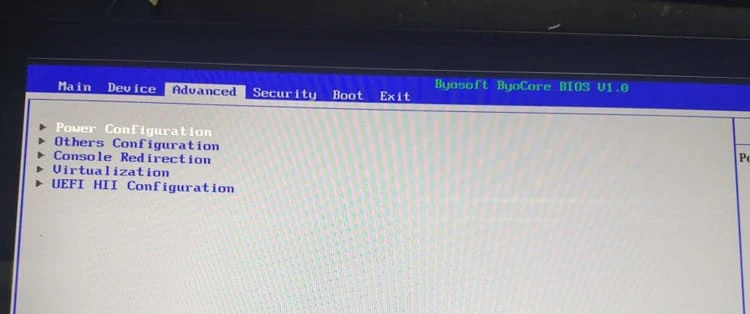
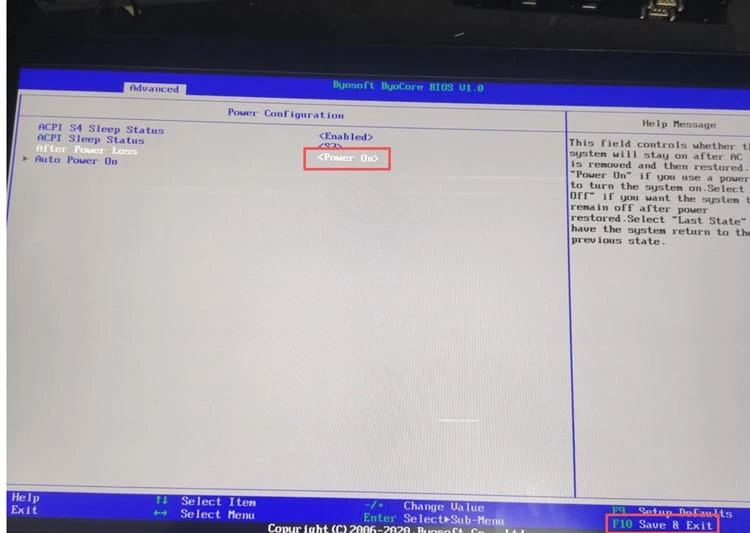
To connect an external keyboard, repeatedly press F12 during startup to enter the BIOS. Select the “After Power Loss” option under “Avanzado,” change it to “Encendido,” and then press F10 to save and exit, as shown in the image below.
Notes on power-on auto-start settings:
After setting up automatic startup in the BIOS, shut down the device after it enters the system (by clicking “Shut Down” at the Start menu). After shutting down, unplug the 220V power cord. The blue indicator light on the power adapter will still be on. Wait until the indicator light on the power adapter goes out completely (about ten seconds) before plugging the 220V power cord back in. At this point, you should see the device automatically power on.